Running a Bitcoin Full Node on Docker
Updated: March 26, 2024
Thanks to Oliver for pointing at some leftovers I had in the template compose file and that prevented containers from lauching.
Running a Bitcoin full node is an essential way to contribute to the decentralized nature of the Bitcoin network and validate transactions. In this article, we will guide you through the process of setting up a Bitcoin full node using Docker.
Prerequisites
To get started, you will need the following:
- A Docker server
docker-compose.ymlfilebitcoin.conffile
Choosing the Docker Image
For our Bitcoin full node, we will use the bitcoind software. We will use the kylemanna/bitcoind image, which has a sizable following. I have reviewed the Dockerfile of this image on GitHub to ensure its integrity, and continue to do before every update or pull. “Don’t Trust, Verify”
We have also chosen to run the Umbrel web UI for bitcoind, which provides an aesthetically pleasing and convenient way to monitor our node’s vitals.
Docker Compose
To incorporate the necessary files for building the Umbrel web UI, you can start by cloning the repository using the following command:
git clone https://github.com/getumbrel/umbrel-bitcoin .
This command will clone the required files into your current working directory, enabling you to proceed with the subsequent steps.
Next, we shall look at the example of a docker-compose.yml configuration below.
With this Compose file, we go slightly further with a couple of additions to the “standard” execution:
- We have added a
deployblock to limit our resource usage, specifying CPU and memory limits for the containers. - We have also created a dedicated network (
bitcoind_default) to easily connect other projects, such as a reverse proxy, in the future if needed.
This allows us to have better control over resource allocation and facilitates potential integration with other services in our network.
version: '3.8'
services:
  bitcoind:
    container_name: crypto_bitcoind
    volumes:
      - /path/to/bitcoin-data:/bitcoin/.bitcoin
    ports:
      - 8333:8333
    image: kylemanna/bitcoind
    deploy:
      resources:
        limits:
          cpus: '2'
          memory: 10240m
    restart: always
  umbrel-bitcoin:
    container_name: crypto_umbrel-bitcoin
    build: umbrel-bitcoin/.
    depends_on: [bitcoind]
    command: ["npm", "start"]
    restart: on-failure
    deploy:
      resources:
        limits:
          cpus: '2'
          memory: 1024m
    ports:
      - "3005:3005"
    volumes:
      - ./umbrel-bitcoin/data/app:/data
      - /path/to/bitcoin-data:/bitcoin/.bitcoin:ro
    environment:
      PORT: "3005"
      BITCOIN_HOST: "bitcoind"
      BITCOIN_P2P_PORT: 8333
      BITCOIN_RPC_PORT: 8332
      BITCOIN_DEFAULT_NETWORK: "mainnet"
      RPC_USER: "your_username"
      RPC_PASSWORD: "your_password"
      DEVICE_DOMAIN_NAME: "test.local"
      BITCOIND_IP: "crypto_bitcoind"
In the configuration above, make sure to adjust the volume paths according to your setup. This configuration sets up two services: bitcoind and umbrel-bitcoin. The bitcoind service runs the Bitcoin daemon, while the umbrel-bitcoin service provides the Umbrel web UI.
Bitcoin Configuration
Here’s an example of a bitcoin.conf file for your Bitcoin full node:
testnet=o
regtest=0
disablewallet=1
printtoconsole=1
server=1
listen=1
txindex=1
rpcuser=your_username
rpcpassword=your_password
dbcache=6144

# includeconf=umbrel-bitcoin.conf

# Singapore
addnode=220.255.226.71:8333
addnode=172.104.181.119:8333
addnode=45.118.135.72:8333
addnode=15.235.145.207:8333
addnode=159.138.87.18:8333
addnode=218.212.51.193:8331
addnode=209.97.170.230:8332
addnode=47.241.220.235:8333
addnode=47.241.190.106:8333
addnode=129.226.216.148:8333
addnode=164.152.167.208:8333
addnode=13.251.210.202:8333
addnode=51.79.176.59:8333

# Recommended
addnode=104.237.131.138
addnode=151.80.205.132
addnode=192.155.82.123
addnode=74.220.255.190
addnode=80.100.203.151
In the bitcoin.conf file, you can customize various settings according to your needs. This configuration includes additional nodes to speed up the initial synchronization process and enables the txindex option to allow the use of ElectrumX. Note that the includeconf line is commented out as this node is managed from the command line. You can uncomment it after the first launch if necessary.
Launching and monitoring the Docker Project
To start the Docker project and run the Bitcoin full node, use the following command:
docker-compose up -d
You can monitor the progress of your node by executing the following command:
> $ docker exec -it crypto_bitcoind /usr/local/bin/bitcoin-cli -getinfo
Chain: main
Blocks: 791603
Headers: 791603
Verification progress: 99.9999%
Difficulty: 49549703178592.68

Network: in 72, out 18, total 90
Version: 240001
Time offset (s): 0
Proxies: n/a
Min tx relay fee rate (BTC/kvB): 0.00001000

Warnings: (none)
The command will display information such as the blockchain’s chain, the number of blocks and headers, verification progress, network details, and more. Keep an eye on this information to ensure your node is syncing correctly.
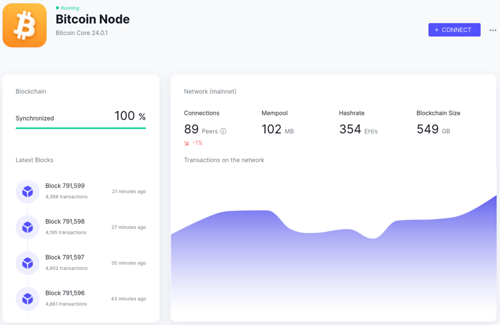
From the Umbrel webui, we can also check our node’s status.
Conclusion
By following the steps outlined in this article, you can easily set up a Bitcoin full node using Docker. Running a full node not only contributes to the Bitcoin network’s decentralization but also allows you to have more control and trustlessness in verifying transactions. Happy running!
Note: Remember to secure your node by following best practices, such as using strong passwords and keeping your software up to date.