Going Paperless With a Simple Yet Powerful Workflow on Linux
Having an efficient paperless workflow can save you space, make documents easily searchable, and prevent the loss of important information. In this post, I’ll explain a straightforward way to digitize paper documents on Linux using free and open source tools.
Why Go Paperless?
- Save space - Paper files take up room. Scanning to digital formats reduces clutter.
- Searchability - Digital documents can be indexed and searched quickly. Good luck finding a phrase in a filing cabinet! With OCR, I can lookup words in my scanned docs.
- Backup - Digital files are easy to back up and protect against loss. Paper is vulnerable to damage and misplacement.
The Workflow
Here are the main components of my paperless workflow on Linux:
- Fedora 38 - Because that’s the distribution I use on my workstation.
simple-scan- A handy scanning utility included in Fedora. It’s lightweight yet full-featured. The interface is clean and simple to use.ocrmypdf- Adds text recognition (OCR) to scanned PDFs, making them searchable, and cleans up the background as well.
Setup
I use French, English, Chinese simplified, and Chinese traditional for OCR languages. Configure languages as needed. You can check for options with dnf search tesseract.
[...]
tesseract-osd.noarch : Orientation & Script Detection Data for tesseract
tesseract-langpack-fra.noarch : French language data for tesseract-tessdata
tesseract-langpack-eng.noarch : English language data for tesseract-tessdata
tesseract-script-hans.noarch : Han (Simplified) script data for tesseract-tessdata
tesseract-script-hant.noarch : Han (Traditional) script data for tesseract-tessdata
[...]
We then install ocrmypdf and its Tesseract OCR dependencies:
dnf install ocrmypdf \
tesseract-osd \
tesseract-langpack-fra \
tesseract-langpack-eng \
tesseract-script-hans \
tesseract-script-hant
Next, we need to grab the post-processing script from simple-scan’s GitLab. This is not well-documented at the moment but simple-scan will only accept a shell script, which also need to handle imput and output.
mkdir /opt/simple-scan-ocr
wget -P /opt/simple-scan-ocr \
https://gitlab.gnome.org/GNOME/simple-scan/-/raw/db90d5b188267b6377305d36b6199f196902e263/src/simple-scan-postprocessing.sh
chmod +x /opt/simple-scan-ocr/simple-scan-postprocessing.sh
Configuring simple-scan
The final step is customizing simple-scan’s settings to leverage the ocrmypdf post-processing script.
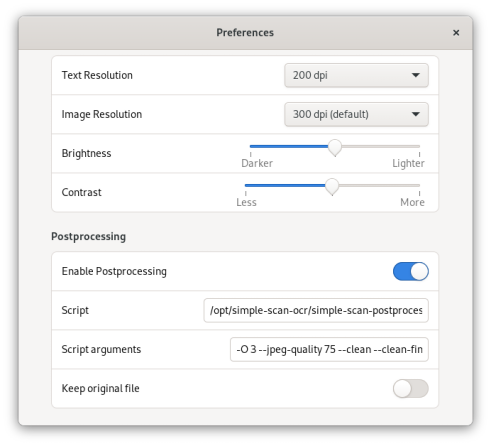
Open simple-scan’s preferences and go to the Post-processing tab. This is where we can configure options for OCR and optimization.
In the Script field, enter the path to the script we downloaded earlier:
/opt/simple-scan-ocr/simple-scan-postprocessing.sh
Next, in the Arguments field, I recommend these options:
-O 3 --jpeg-quality 75 --clean --clean-final --output-type pdf
Let’s break down what each one does:
-O 3- This enables high compression optimization in ocrmypdf. Level 3 provides a good balance of size reduction while maintaining quality.
--jpeg-quality 75- I set the JPEG quality to 75 (out of 100) since OCR and cleaning tend to bloat PDF sizes. The higher quality helps compensate for compression artifacts.
--clean&--clean-final- These options do page de-speckling and optimization in ocrmypdf. It greatly reduces file size but can lose fine details.
--output-type pdf- Makes the final output a PDF file and not a PDF/A which is much less space-efficient.I’ll often tweak the language argument too. For example,
-l fratells ocrmypdf this document is likely French text.
With these settings tuned, scanned documents get OCR’d, compressed, and output as clean searchable PDFs ready for my digital archive!
Space saving details from the command line:
$ ocrmypdf -O 3 --jpeg-quality 75 --clean --clean-final --output-type pdf \
"Scanned Document_orig.pdf" \
"Scanned Document_demo.pdf"

Scanning contents     ━━━━━━━━━━━━━━━━━━━━━━━━━━━━━━━━━━━━━━━━ 100% 1/1 0:00:00
OCR                   ━━━━━━━━━━━━━━━━━━━━━━━━━━━━━━━━━━━━━━━━ 100% 1/1 0:00:00
Postprocessing...
Recompressing JPEGs   ━━━━━━━━━━━━━━━━━━━━━━━━━━━━━━━━━━━━━━━━   0% 0/0 -:--:--
Deflating JPEGs        ━━━━━━━━━━━━━━━━━━━━━━━━━━━━━━━━━━━━━━━━   0% 0/0 -:--:--
PNGs                  ━━━━━━━━━━━━━━━━━━━━━━━━━━━━━━━━━━━━━━━━   0% 0/1 -:--:--
JBIG2                 ━━━━━━━━━━━━━━━━━━━━━━━━━━━━━━━━━━━━━━━━   0% 0/0 -:--:--

Image optimization ratio: 1.30 savings: 23.2%
Total file size ratio: 0.93 savings: -7.5%
Conclusion
With this straightforward paperless workflow, I can quickly digitize documents and make them easy to manage and find on my Linux computer. The open source tools provide OCR capability without cost or licensing hassles.
Combined with elasticsearch and nextcloud, this makes looking for documents a breeze.
Let me know if you have any other tips for efficient scanning and archiving!